LM Studio 0.3.4 ships with Apple MLX
LM Studio 0.3.4 ships with an MLX engine for running on-device LLMs super efficiently on Apple Silicon Macs.
Download LM Studio for Apple Silicon from here. Read on to learn more about MLX in LM Studio.
Llama 3.2 1B on M3 Max runs at ~250 tokens per second
👾 Interested in designing and building systems? We are hiring. See open positions here.
MLX support in LM Studio 0.3.4 includes:
- Search & download any supported MLX LLM from Hugging Face (just like you've been doing with GGUF models)
- Use MLX models via the Chat UI, or from your code using an OpenAI-like local server running on localhost
- Enforce LLM responses in specific JSON formats (thanks to Outlines)
- Use Vision models like LLaVA and more, and use them via the chat or the API (thanks to mlx-vlm)
- Load and run multiple simultaneous LLMs. You can even mix and match
llama.cppand MLX models!
The rest of this blog post is a deep dive into the technical details of MLX in LM Studio.
Special thanks to Awni Hannun (MLX) Rémi Louf (.txt/Outlines) for reviewing drafts of this blog post as well as the mlx-engine code.
What is MLX?
... and why should I care?
MLX is a new Open Source AI/ML software stack from Apple, optimized specifically for Apple Silicon. It utilizes the powerful acceleration hardware in Apple's M chips.
Developed by engineers at Apple and supported by a growing community of developers, MLX is positioned to be an extremely competitive choice for running on-device AI on Macs.
The MLX core library is written in C++, completed with community-supported Python as well as Swift frontends.
We're excited to unveil MLX support in LM Studio. This blog post will cover some technical details about MLX in general, and LM Studio's MLX engine in particular.
LM Studio's mlx-engine is open source
The LM Studio's MLX Engine is a Python module built using a combination of the following packages:
- mlx-lm - Apple's MLX (Python frontend) by Awni Hannun and the team from Apple.
- Outlines - Structured generation from LLMs by Rémi Louf and the team at .txt
- mlx-vlm - Vision LLMs for Apple's MLX by Prince Canuma.
mlx-engine is open source under the MIT license. Repo: https://github.com/lmstudio-ai/mlx-engine.
MLX in LM Studio using... Python?!
Our journey to integrate MLX into LM Studio started with Swift. While this approach worked perfectly fine, ultimately the following design goals made Python a better choice.
Design Goal 1: We want to iterate on the MLX engine with the community
- Many more developers, researchers are familiar with Python
Design Goal 2: We want to be able to support the latest models and techniques as soon as they are released
- MLX in Python tends to receive support for new models sooner
Adding mlx-lm support to LM Studio required the ability to deploy and run Python components in a portable, cross-platform fashion. Ideally, we also want to be able to fully integrate those components with the existing C/C++ components already used in the main LM Studio application (which ended up ruling out some potential candidate solutions, such as conda environments).
LM Studio's initial Python runtime support is built atop the python-build-standalone project, and Python virtual environments, using a soon-to-published utility that supports the creation of an integrated set of independently downloadable Python application environments that share common runtime and framework layers (after all, nobody wants to download and install multiple copies of PyTorch or CUDA if they can reasonably avoid it).
This "stacked virtual environments" utility uses the CPython interpreter's "site customization" feature, together with some pre-publication and post-installation adjustments to the virtual environment contents, to allow these virtual environments to be reliably transferred between machines and the included application launch modules invoked with CPython's -m command line switch.
Look for more detailed technical announcements on that front later in October.
Mini Deep Dive: some of mlx-engine's features
Running text generation models with MLX
A critical piece of the python MLX ecosystem is mlx_lm. This project provides an easy way to run large language models with a CLI tool, or a few lines of python, for example:
from mlx_lm.utils import load, generate_step
import mlx.core as mx

def mlx_stream(prompt: str):
    model, tokenizer = load("/path/to/mlx/model")
    prompt_tokens = mx.array(tokenizer.encode(prompt))
    while True:
        yield generate_step(
            model=model,
            prompt=prompt_tokens
        )

for token in mlx_stream(prompt="Hello world!"):
    print(token, end="", flush=True)
Let's pop the hood of generate_step, so that we have a better understanding of what's going on
def generate_step(*args, **kwargs):

    # --snip--

    def sample(logits):
        logprobs = logits - mx.logsumexp(logits)
        if temp == 0:
            token = mx.argmax(logits, axis=-1)
        else:
            if top_p > 0 and top_p < 1.0:
                token = top_p_sampling(logits, top_p, temp)
            elif min_p != 0.0:
                token = min_p_sampling(logits, min_p, min_tokens_to_keep, temp)
            else:
                token = categorical_sampling(logits, temp)

        return token, logprobs

    y = prompt
    tokens = None

    def _step(y):
        logits = model(y[None], cache=cache)
        logits = logits[:, -1, :]

        nonlocal tokens
        tokens = mx.concat([tokens, y]) if tokens is not None else y
        for processor in logits_processor:
            logits = processor(tokens, logits)

        y, logprobs = sample(logits)
        return y, logprobs.squeeze(0)

    y, logprobs = _step(y)
    while True:
        next_y, next_logprobs = _step(y)
        yield y.item(), logprobs
        y, logprobs = next_y, next_logprobs
We can see the important operations happening here:
- The model is evaluated using its
__call__method. This returns an array of logits, where each element corresponds to an item in the model's vocabulary. The logits define a probability distribution over the items in the vocabulary. - A token is selected (i.e. sampled) from the array of logits using the user-provided sampling parameters.
- That sampled token is returned to the caller.
Let's see how we can add features to this generation loop that our users would love.
Enabling structured generation with Outlines
Let's add a feature to the generator: the user can request that the generator outputs valid json. We can use Outlines from .txt for this.
Outlines enables structured generation from LLMs (e.g. creating json output). This package comes with support for the mlx_lm runtime, which we will leverage. Outlines does its work by converting a user-provided json schema into regex. Take a look at this title schema.
{
  "type": "object",
  "properties": {
    "title": {
      "type": "string",
      "minLength": 1
    }
  },
  "required": [
    "title"
  ]
}
Outlines converts that schema into this regex string:
\{[ ]?"title"[ ]?:[ ]?"([^"\\\x00-\x1F\x7F-\x9F]|\\["\\]){1,}"[ ]?\}
Here is a more human readable (but less precise) version of that regex string: \{"title": ".{1,}"\}
Using this regex string, the generation loop of Outlines is as follows:
- Evaluate the model. I.e., process the prompt and output the logits for each token.
- For each token, evaluate whether sampling it would violate the regex. If so, we set its probability to zero. We say that we mask the logits.
- Sample a token using the masked logits.
mlx_lm's generate_step lets us define logits processors, so let's define a processor to mask the logits so the output matches the regex
from outlines.processors.structured import JSONLogitsProcessor

class OutlinesJSONLogitsProcessor:
    def __init__(self, json_schema, tokenizer):
        self.logits_processor = JSONLogitsProcessor(json_schema, tokenizer)

    def __call__(self, tokens: mx.array, logits: mx.array):
        logits_1d = logits.flatten()  # convert to 1-dimensional array
        logits_1d = self.logits_processor(tokens, logits_1d)
        logits = logits_1d[None]  # convert back to original shape
        return logits
And we can invoke the mlx generation step with an instantiation of this object
def mlx_stream(prompt: str):
    model, tokenizer = load("/path/to/mlx/model")
    prompt_tokens = mx.array(tokenizer.encode(prompt))
    json_schema='''{"type":"object","properties":{"title":{"type":"string","minLength":1}},"required":["title"]}'''  # define schema
    while True:
        yield generate_step(
            model=model,
            prompt=prompt_tokens,
            logits_processor=[OutlinesJSONLogitsProcessor(json_schema, tokenizer)]  # output valid json
        )
And there we have it! Now we can generate json whenever a json schema is provided.
Running vision models with MLX
Another piece of the MLX python ecosystem is mlx_vlm, which is a package for running vision LLMs. Here is the generate_step method in mlx_vlm, edited for conciseness
def generate_step(*args, **kwargs):
    def sample(logits: mx.array) → Tuple[mx.array, float]:
        if temp == 0:
            token = mx.argmax(logits, axis=-1)
        else:
            if top_p > 0 and top_p < 1.0:
                token = top_p_sampling(logits, top_p, temp)
            else:
                token = mx.random.categorical(logits * (1 / temp))
        return token, logprobs

    # --snip--

    def _step(y):
        logits = model.language_model(y[None], cache=cache, mask=mask)
        logits = logits[:, -1, :]
        y, logprobs = sample(logits)
        return y, logprobs.squeeze(0)

    y = prompt
    logits = model(y, pixel_values, cache=cache, mask=mask)
    logits = logits[:, -1, :]
    y, logprobs = sample(logits)
    while True:
        next_y, next_logprobs = _step(y)
        yield y.item(), logprobs
        y, logprobs = next_y, next_logprobs
Let's compare and contrast the mlx_vlm implementation with the mlx_lm implementation:
- The
mlx_vlmevaluation uses themodel.__call__method. The very first evaluation processes the pixel data, and the subsequent evaluations use the underlying language model. - The
samplefunction inmlx_vlmhas fewer sampling methods available compared tomlx_lm. - There is no logits_processor in
mlx_vlm.
It would be beneficial to use the logits processing and sampling from mlx_lm, while also using vision models from mlx_vlm. Let's implement that!
We'll write a class that will evaluate the pixel data on first call and use the language model on subsequent calls:
class VisionModelWrapper:
    def __init__(self, vision_model, image_processor, pixel_values, mask):
        self.vision_model = vision_model
        self.image_processor = image_processor
        self.pixel_values = pixel_values
        self.mask = mask
        self.first_call = False

    def __call__(self, *args, **kwargs):
        if self.pixel_values is not None and not self.first_call:
            self.first_call = True
            return self.vision_model(self.input_ids, self.pixel_values, self.mask, **kwargs)
        else:
            return self.vision_model.language_model(*args, mask=self.mask, **kwargs)
And now, we can pass it into mlx_lm.generate_step:
def mlx_stream(prompt: str):
    # load and wrap the vision model
    vision_model_dict, tokenizer = load_vision_model("/path/to/mlx/vision_model", "/path/to/image")
    vision_model_wrapper = VisionModelWrapper(**vision_model_dict)

    prompt_tokens = mx.array(tokenizer.encode(prompt))
    json_schema='''{"type":"object","properties":{"title":{"type":"string","minLength":1}},"required":["title"]}'''
    while True:
        yield generate_step(
            model=vision_model_wrapper,
            prompt=prompt_tokens,
            logits_processor=[OutlinesJSONLogitsProcessor(json_schema, tokenizer)]
        )
And now we can prompt a LLM with an image, and have it make a title for us!
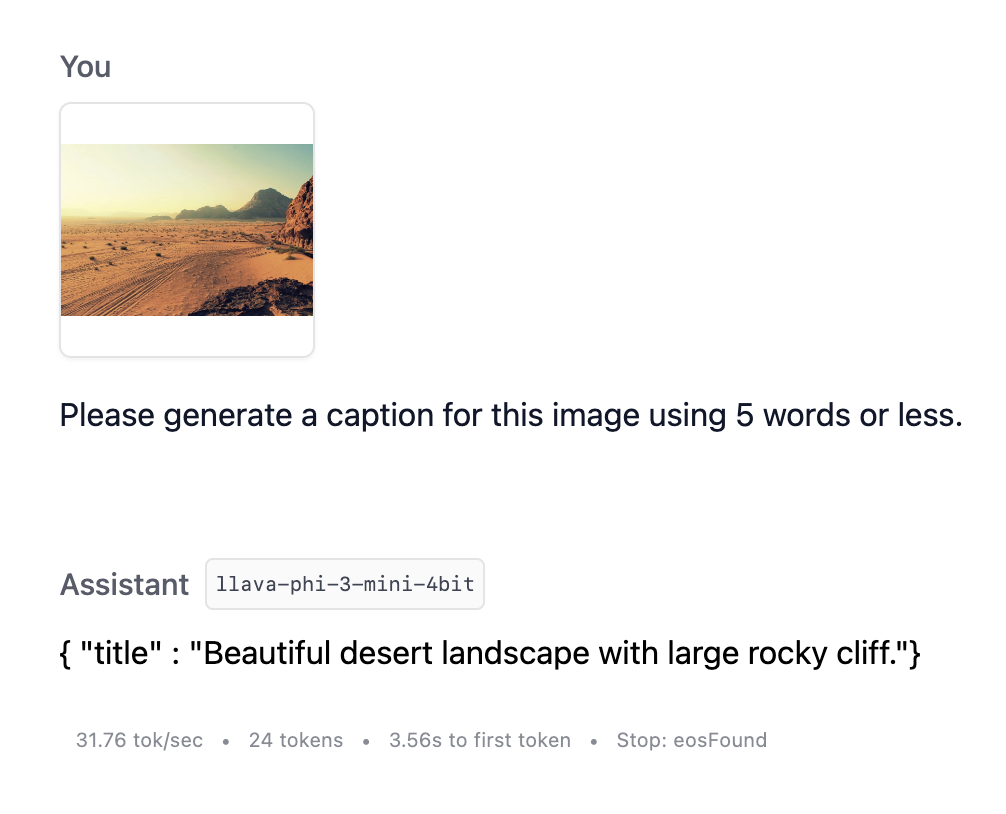
Captioning an image using a VLM and structured output
KV Caching Across Prompts
KV (key-value) caching across prompts is an optimization technique that enables LLM engines to reuse computations from previous interactions. This can greatly improve model response time, or "Time to First Token".
KV caching is especially valuable in a chat scenario, where a large portion of the prompt (the chat history) is often the same across generation requests to the model.
Example
Timestep 1 (T1) - User sends prompt "Summarize this long article: <long article here...>"
{
    "User" : "Summarize this long article: <long article here...>"
}
Timestep 2 (T2) - The LLM engine performs inference on the input, computing large matrix multiplications between the model weights and the input token embeddings to yield output tokens: "This article discusses the impact of..."
{
    "User" : "Summarize this long article: <long article here...>",
    "AI" : "This article discusses the impact of..."
}
Timestep 3 (T3) - User sends prompt "Are there any people mentioned in the article?". The entire chat history is sent to the LLM to give it proper context to continue the conversation.
{
    "User" : "Summarize this long article: <long article here...>",
    "AI" : "This article discusses the impact of...",
    "User" : "Are there any people mentioned in the article?"
}
Timestep 4 (T4) - The LLM engine performs inference on the input (all tokens from T1, T2, and T3), computing large matrix multiplications between the model weights and input token embeddings to yield output tokens: "Yes, the article mentions several key figures, including..."
{
    "User" : "Summarize this long article: <long article here...>",
    "AI" : "This article discusses the impact of...",
    "User" : "Are there any people mentioned in the article?",
    "AI" : "Yes, the article mentions several key figures, including..."
}
KV Caching
KV caching takes advantage of the fact that by the time we're at T3, asking the LLM about "people mentioned in the article", we've already performed matrix computations in T1 and T2 that are the same as those that need to be computed in T3:
{
    # START OF PREVIOUSLY COMPUTED
    "User" : "Summarize this long article: <long article here...>",
    "AI" : "This article discusses the impact of..."
    # END OF PREVIOUSLY COMPUTED
    "User" : "Are there any people mentioned in the article?"
}
So if we save the results of the computations in T1 and T2 to a KV CACHE, and give the engine access to the KV CACHE at T3, then the engine only has to perform computations on the new part of the prompt, "Are there any people mentioned in the article?":
{
    KV CACHE,
    "User" : "Are there any people mentioned in the article?"
}
This can greatly improve response time in T4. In our testing, with a ~3000 token article and Meta-Llama-3.1-8B-Instruct-4bit, T4 response time dropped from ~10 seconds without any KV caching, to just 0.11 seconds with it.
Our Current MLX KV Caching Implementation
At the time of implementation, mlx-lm exposed a cache_history parameter to its generate_step function:
def generate_step(
    *args,
    cache_history: Optional[List[Tuple[mx.array, mx.array]]] = None,
    **kwargs
) → Generator[Tuple[mx.array, mx.array], None, None]:
By passing the proper cache_history (akin to KV CACHE above), we were able to implement an intial
version of KV caching in our MLX engine.
We did this through an adaptation of mlx-lm's PR Add the ability to load the KV cache from a file, in which we pre-process the prompt through the model inside of a cache wrapper:
    def process_prompt(self, prompt_tokens, cache_wrapper, generate_args) → mx.array:
        """
        This method processes the prompt and adds its tokens to the cache history
        """

        # --snip--

        # prefill cache with prompt_tokens, except those that need to have a repetition penalty applied
        # (repetition penalty not currently possible for cached tokens)
        if "repetition_context_size" not in generate_args:
            generate_args["repetition_context_size"] = (
                20  # default value for mlx_lm.utils.generate_step
            )
        repetition_context_size = generate_args["repetition_context_size"]

        cache_history, generate_step_input = cache_wrapper.update_cache(
            prompt_tokens,
            num_tokens_to_exclude=repetition_context_size
        )

        generate_args["cache_history"] = cache_history

        return generate_step_input
cache_wrapper.update_cache, seen above, above draws from cache_prompt.py to fill the cache chunk by chunk:
    # adapted from https://github.com/ml-explore/mlx-examples/blob/324184d670ec11916a5e92314171d497b312eefe/llms/mlx_lm/cache_prompt.py#L121-L137
    step_size = 512
    processed: int = 0
    while processed < len(tokens_to_process):
        # Here we evaluate the input prompt chunk by chunk to fill the cache
        chunk: mx.array = tokens_to_process[processed:processed+step_size]
        self.model(chunk[None], cache=self.cache)
        mx.eval([c.state for c in self.cache])
        self.tokens: mx.array = mx.concatenate([self.tokens, chunk]) if self.tokens is not None else chunk
        processed += chunk.size
Now that the cache has been created and saved to generate_args["cache_history"], we can simply pass generate_args and generate_step_input to mlx_lm.utils.generate_step:
    # `process_prompt` function from above
    generate_step_input = process_prompt(prompt_tokens, cache_wrapper, generate_args)

    max_tokens = generate_args.pop("max_tokens")

    for (token, _), n in zip(
        # generate_step_input is now just the uncached repetition penalty tokens
        # generate_args has "cache_history" member, set in `process_prompt`
        mlx_lm.utils.generate_step(generate_step_input, model, **generate_args),
        range(max_tokens),
    ):
This results in the generate_step function being able to utilize prior computations, stored in cache_history, to greatly reduce response time when compared to performing raw processing of the entire prompt.
We can then store this cache_history object across prompt processing calls, building upon it to keep chat scenarios responsive, even during very long conversations. However, it is critical to ensure that the tokens processed into cache_history still correspond to the beginning tokens in the prompt when doing so. For more information on this, view the cache resetting behavior within the update_cache function.
What else is new in LM Studio 0.3.4
New
- Mission Control:
Cmd+Shift+Mto search for models,Cmd+Shift+Rto manage LM Runtimes - Set Structured Output (JSON Schema) from the UI
Bug Fixes
- Fix for Black Screen after prolonged use (reference: lmstudio-bug-tracker#98)
- Fix for no port other than 1234 working for the local server (reference: lms#80)
- Fix for embedding API not working from Obsidian (reference: tracker#142)
- Fix for RAG sometimes failing during document processing
Even More
- Download the latest LM Studio app for macOS, Windows, or Linux.
- New to LM Studio? Head over to the documentation: Docs: Getting Started with LM Studio.
- For discussions and community, join our Discord server.
- If you want to use LM Studio at your organization at work, get in touch: LM Studio @ Work